A step-by-step screenshot tutorial for automatically BCC an email address for all outgoing Outlook messages
perhaps it was due to one too many passive aggressive intra-office stealth BCCs (Blind Carbon Copy.) But seriously, for some reason, Microsoft decided to roll back access to BCCs in Office 2010. For one, the new message dialog doesn’t even have a BCC field. But you also can’t set up Outlook 2010 rules to automatically BCC someone (although you can set up a rule to automatically CC a message.) For my purposes, this is kind of a pain. I am a Gmail/Outlook hybrid user (I have about three different email addresses, each for a different purpose) and I like to keep all of my messages archived in my main Gmail account for easy reference. So, what I wanted was a way to forward all of my sent messages to my Gmail account (I already have all incoming messages forwarded there by a server-side rule.) Easier said than done but I think I’ve figured out the easiest way.
Now, you can use the BCC field for one-offs. But what if you wanted to automatically BCC yourself (or someone else) on every outgoing message? To do this, follow the steps below.




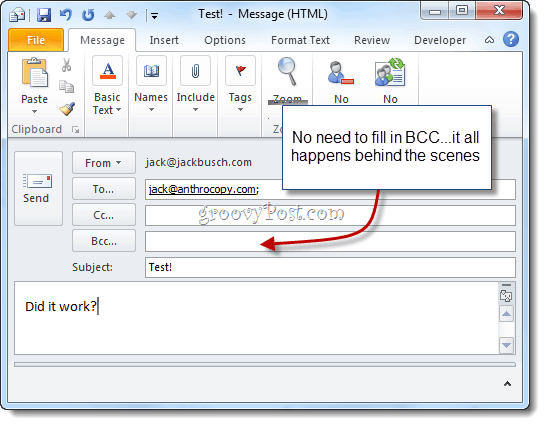
Now, when you send messages from Outlook 2010, they’ll be automatically Bcc'd the recipient you chose in the Visual Basic editor. You don’t have to type their name in the BCC field, nor will you even see it entered into the BCC field since the Visual Basic script kicks in after you hit send. (A handy tip for any cyber spies.)
Show the BCC Field in New Emails in Outlook 2010
Step 1
Launch Outlook 2010.Step 2
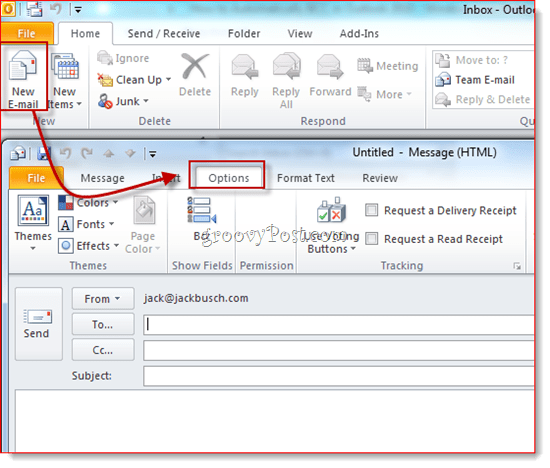
Click the New Email button. In the message composition window, click the Options tab.
Step 3
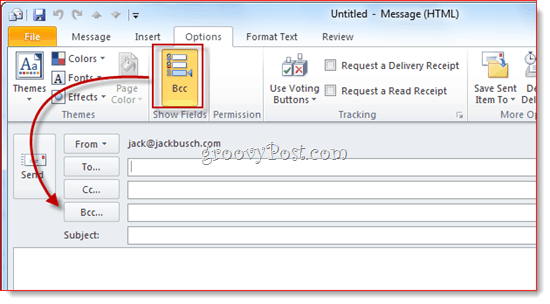
Click the BCC button. This action reveals the BCC field. Henceforth, you shall have access to the BCC field in all future Outlook 2010 emails. If you get tired of the extra space it takes up, just click it again to be rid of it.
Now, you can use the BCC field for one-offs. But what if you wanted to automatically BCC yourself (or someone else) on every outgoing message? To do this, follow the steps below.
Display the Developer Ribbon
I’m basing this how-to on a great bit of custom Visual Basic code written by Michael Kizer. Michael wrote this VBA snippet for Outlook 2007, but it works for Outlook 2010. The only problem: it’s a bit tough to find Visual Basic Editor in Outlook 2010. It’s hiding in the Developer ribbon, which, by default, is hidden from view. Here’s how to enable it:Step 1
Launch Outlook 2010.Step 2
Click the File tab and choose Options.
Step 3
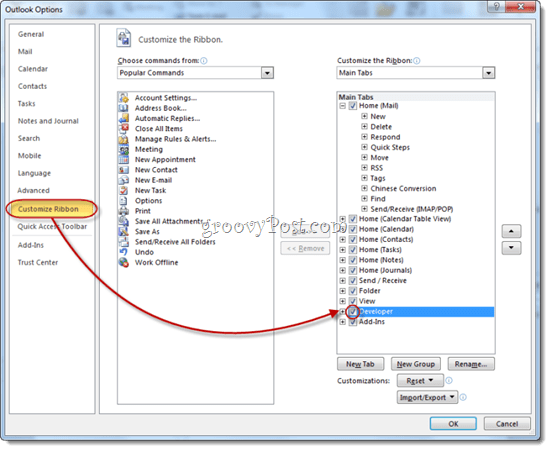
Click Customize Ribbon on the left-hand panel. Now, in the list on the far right, make sure Developer is checked. Click OK.
Step 4
The Developer tab will now be revealed in your Outlook 2010 ribbon.
Automatically BCC Outgoing Messages in Outlook 2010
Now, it’s time to add the code that Mr. Kizer put together.Step 1
Go to the Developer tab and click Visual Basic.Step 2
On the left, expand Project1 (VbaProject.OTM to reveal Microsoft Outlook Objects. Expand Microsoft Outlook Objects and then double-click ThisOutlookSession.
Step 3
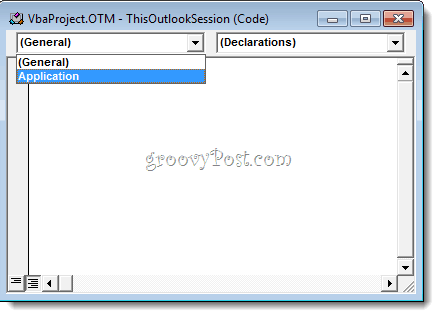
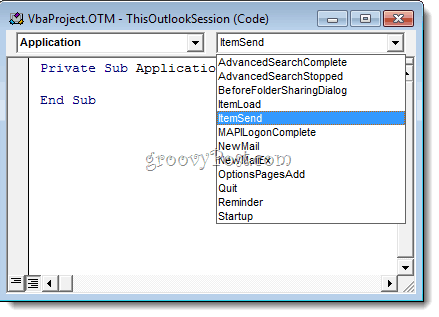
In the code editor window, choose Application from the drop-down menu in the top-left.
Step 4
In the top-left drop-down menu, choose ItemSend.
Step 5
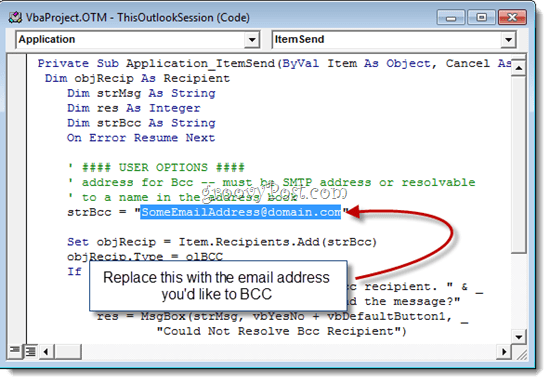
Position your cursor after “Private Sub Application_ItemSend(ByVal Item As Object, Cancel As Boolean)” and before “End Sub.” Now, copy and paste the following between those two lines.Dim objRecip As Recipient Dim strMsg As String Dim res As Integer Dim strBcc As String On Error Resume Next ' #### USER OPTIONS #### ' address for Bcc -- must be SMTP address or resolvable ' to a name in the address book strBcc = "SomeEmailAddress@domain.com" Set objRecip = Item.Recipients.Add(strBcc) objRecip.Type = olBCC If Not objRecip.Resolve Then strMsg = "Could not resolve the Bcc recipient. " & _ "Do you want still to send the message?" res = MsgBox(strMsg, vbYesNo + vbDefaultButton1, _ "Could Not Resolve Bcc Recipient") If res = vbNo Then Cancel = True End If End If Set objRecip = Nothing
Step 6
Look for the line that reads: strBcc=”SomeEmailAddress@domain.com” and replace it with the email address you’d like to BCC for SomeEmailAddress@domain.com. For example, swap it out for mysecondaryemail@gmail.com or igbrother@supervisor.com.
Step 7
Don’t forget to save the changes. Close the Visual Basic Editor and return to Outlook.
Now, when you send messages from Outlook 2010, they’ll be automatically Bcc'd the recipient you chose in the Visual Basic editor. You don’t have to type their name in the BCC field, nor will you even see it entered into the BCC field since the Visual Basic script kicks in after you hit send. (A handy tip for any cyber spies.)


Comments
Post a Comment